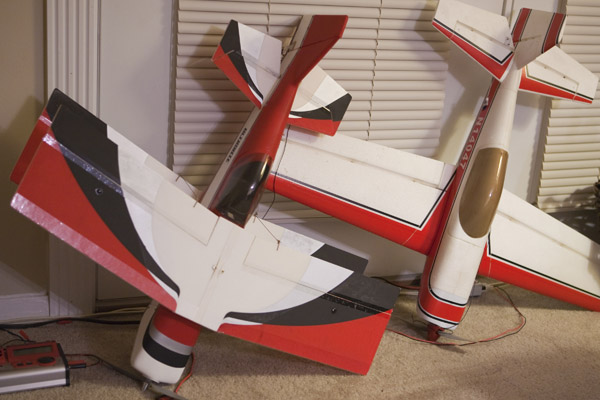
I have been building and flying 'Park Flyer' electric radio-controlled airplanes for the past few years and really enjoy it! Here are a few pictures and descriptions of the planes I have built and flown.


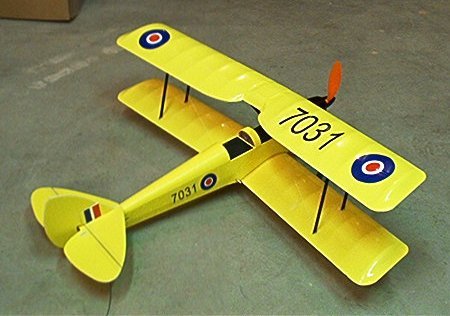
This is a fun little airplane! I built the airplane in June of 2002 and it has proven to be a great performer and extremely easy to fly.The kit is widely available and easy to assemble. There are quite a few modifications I made to my plane, however, that I highly recommend.
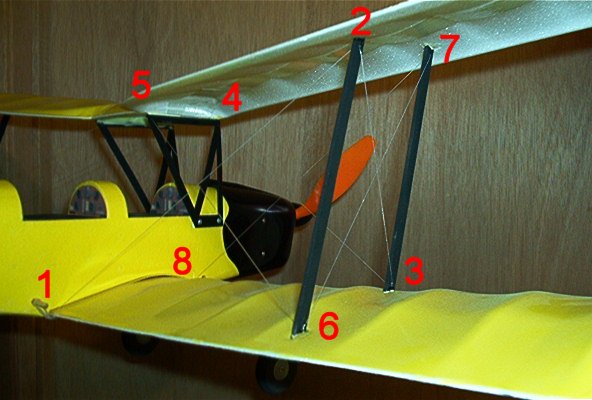
First and foremost, reinforce the wings! The most effective and lightest weight method to do this is to use monofilament fishing line to simulate the rigging wires of the actual plane. Click on the picture on the left for more detail. I used a single piece of monofilament to brace the left and right sides of the wings. Zig-zag the line between the cabane struts and the outer struts as shown in the photo. Start by drilling 1/16 inch diameter holes in the wings at each numbered point in the photo. Tie a knot in one end of the monofilament and string it from the bottom of the wing through the hole at point 1. Lace the line through points 2-7, and then tie it off at point 8 keeping the line taught throughout. By doing it this way the wings can still be removed from the fuselage without disturbing the rigging.
Also, be sure to put some reinforcements under the four corners of the bottom wing for the rubber bands. I used 1/64 birch ply for the reinforcements. For extra security, I used strapping tape for a simple, lightweight spar. Apply it to the underside of both the top and bottom wings. By putting spars on the bottoms of each wing, they will resist failure while under a lifting load. See the picture to the left for more details.
Next, get rid of the kit wheels and put on some Du-Bro or Dave Brown micro-light wheels. These don't add that much weight and they look a whole lot better! I attached my wings to the cabane struts and outer struts with epoxy and microballoons. Mix up a thick paste and apply it generously. I replaced the ABS kit struts with balsa struts, which are much stiffer and lighter weight. I used 1/8 x 1/4 balsa cut to length, painted with flat black enamel, and glued with epoxy to the top and bottom wings.
Finally, right-click on the picture to the left to download your very own instrument panels for the front and rear cockpits. To save the GWS Tiger Moth Instrument Panel, right-click and select Save Image As... Choose a path and filename, then click Save. Print the images with a color inkjet printer and use 3M-77 adhesive to stick them to the model. The images are sized so they will fit the panels if they are printed as-is. They add a nice finishing touch, and they are cheap and lightweight!
Another good touch is to add a black cockpit. To do this, paint a piece of white typing paper with flat black spray paint, cut it to shape, and glue it on with 3M-77. This is easier than trying to paint the foam fuselage directly. If any touch up is required, use a black Sharpie marker.
Flight performance is outstanding! The ready to fly weight is 9.0 ounces, which gives a very low 4.59 oz/sq ft wing loading. The total wing area is 282 sq in. Just be careful about flying it in the wind because it is so light! Aerobatics are about what you would expect for a very draggy biplane with rudder and elevator control. You can do good loops and so-so spins, but roll performance is pretty poor.
I use a GWS pico receiver, two Expert SL260 servos (rudder and elevator), a GWS 5-amp speed control, and an E-Flite 300 mAh NiMH battery with a Wattage PF-12 peak-detect battery charger. I highly recommend these batteries and charger. Without lift, I get 15 minutes of flying time every time.
UPDATE on The Tiger Moth! The airplane is now just over three years old and I recently noticed a marked decrease in maximum power available from the electric motor. I replaced the motor and battery a while ago and am now getting consistent 15-20 minute flight times (even with no lift!). I have made no modifications to the airframe since it was built, so the new motor and battery have made a big difference in the performance. I am also now using a new Great Planes Triton battery charger that I really like. The older Wattage PF-12 charger quit a few months back and the Triton has been a great replacement. Another UPDATE: I've now been through the second round of motor replacements... All is well and the Tiger Moth continues to be a great little airplane for fun and easy flying.

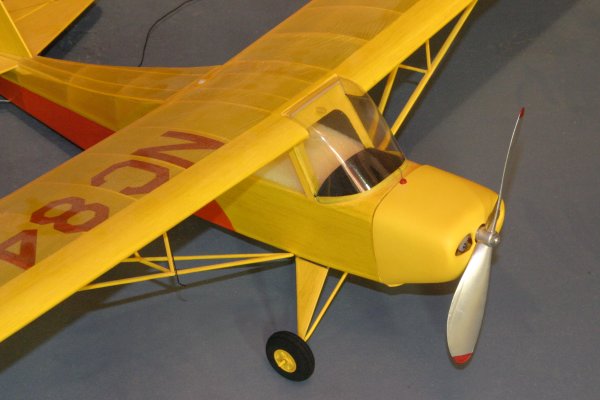
Next came a plans-built Nick Ziroli, Sr Aeronca Champ (7AC). This is a great little airplane because it is so realistic and easy to fly. I built the model in July and August of 2002, just after building the Tiger Moth. The model was entirely scratchbuilt except for the cowling, windshield, and wheels that I obtained from Nick Ziroli, Sr. Covering is Coverite CoverLite yellow and orange. The paint that matches the yellow and orange is Testors Insignia Yellow (#4721) and International Orange (#4682) ModelMaster Acryl acrylics. Decals were made from digital pictures of actual Aeronca Champs scaled and printed onto decal film.
It flies a good bit faster than the Tiger moth, but then again it has about half the wing area and the same flying weight. I use the recommended Titanic Airlines 280 motor with a 3:1 gear reduction and the Gunther prop. Radio gear consists of a GWS receiver, two Expert SL260 servos, an FMA Direct 5 amp speed control, and a re-packaged E-Flite 300 mAh NiMH battery. The ready to fly weight is 9.9 oz, which gives a wing loading of 8.38 oz/sq ft. Wing area is 170 sq in.


Nick said the reason he drew plans for the Champ was because it wasn't a Cub, so I figured why not and decided to build a Cub to go with the Champ. I took the Bob Nelitz 1/3 scale J-3 plans and scaled them down by a factor of four. This will make a nice 1/12 scale Cub with 36 inch wingspan. I currently have aircraft nearly ready to go. The cowl has been vacuformed and awaits the scale engine detail. I will use the Titanic Airlines 280 motor with the Gunther prop and 3:1 gear reduction. This model was started soon after the Champ, but has dragged on now for several years.
This model is being built entirely from scratch, except for the motor, wheels, and radio. I even built a vacuform machine to mold the cowling!
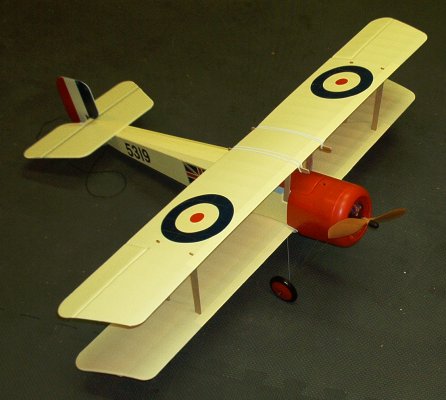
Another RC electric I have is a Sig Bristol Scout, a WW I biplane that looks to be well suited to electric flying. The kit is pretty nice, although not quite as well done as the GWS Tiger Moth. The wings are a little more flimsy, the cowling is a little heavier, and the decals are not nearly as robust. I made the same modifications to this one as the Tiger Moth, including the 1/64 ply reinforcements on the bottom wing for the rubber bands, monofilament flying wires, and strapping tape to reinforce the bottom of the wings. It seems heavier than the Tiger Moth, so I expect it will fly a bit faster. I started this model in April of 2004 and had it flying by May of 2004.
I have flown the Bristol Scout and found it to be fairly nice flying, but it has a few quirks that will need to be fixed before it is really ready to go. The motor does have plenty of power and the climbout is good and flight speed is reasonable. However, because of the flat wings (no dihedral) and the all- moving rudder (it has no separate vertical fin), it has a tendency to be spirally unstable in a descending turn. This was a little disconcerting during the first flight, but I think can be fairly easily overcome. The hinge for the rudder is Scotch tape (as described in the directions) which allows the rudder to vibrate excessively at full power. I am going to make it more robust using a conventional plastic hinge to keep the rudder more stable at higher power settings. And yes, it does fly a bit faster than the Tiger Moth, as expected.
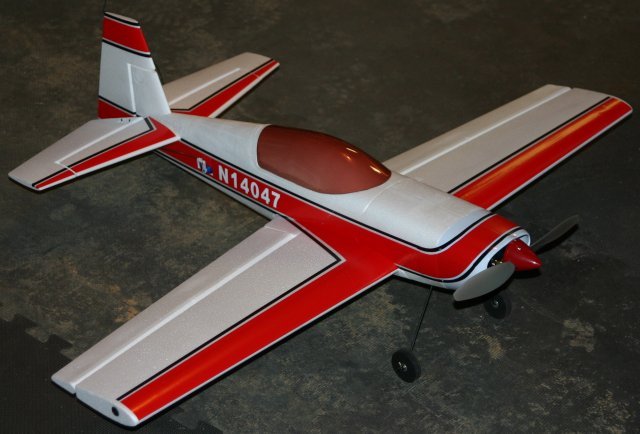
Another RC electric I have is an Ultrafly Extra 300S, a highly aerobatic model of the famous aerobatic airplane flown by folks like Patty Wagstaff. The model is well-designed, straightforward to build, strong, and good-looking. I built it stock out of the box initially, but have made a few modifications as I gain experience flying it. I started this model in April, 2005 and finished it by May, 2005.
The first mod I made was to replace the kit tailwheel with a bent music wire tail skid to relieve the rudder servo from stripped gears after a hard landing. I also replaced the gears in the rudder servo at the same time. The landing gear mount is another weak spot that I found after another hard landing. The bent wire gear was originally held in place with a molded plastic piece and two small wood screws, per the kit instructions. After the plastic piece was broken in a hard landing, I modified it by adding two more screws and rubber bands to hold the wire gear in place. It seems to work well.
I am using 3 HiTec HS-50 servos for the rudder, elevator, and ailerons. I have a HiTec 555 4-channel micro receiver with a Great Planes ElectriFly C-30 mini speed control (30 amp). The battery is a Great Planes ElectriFly 2-cell, 1200 mAh 7.4 volt Li-Poly battery. This combination brings the ready-to-fly weight to 17.4 ounces. The manufacturer-reported wing area is 263 sq in (1.826 sq ft), while my calculated wing area was 246 sq in (1.711 sq ft). This gives a wing loading of 9.52 oz/sq ft if you believe the manufacturer, or 10.1 oz/sq ft using my numbers. Either way, the wing loading is reasonable and results in a nice flying airplane with lots of extra power to get it up and going great.
I have flown the Extra quite a few times now and am really starting to like the way it flies. The brushed motor is completely stock and with a 2-cell Li-Poly 1200 mAh, 7.4 volt battery there is plenty of pep to get the model climbing fast and it does great aerobatics.
The only tricky part is landing (as you can guess from the earlier comments about beefing up weak spots on the airframe!). Most of the hard landings have come after the motor has quit and the model is gliding. Without some power the descent rate is very high and it becomes unstable when trying to slow down and flare to land. I will try and land every time from now on with the motor still running.
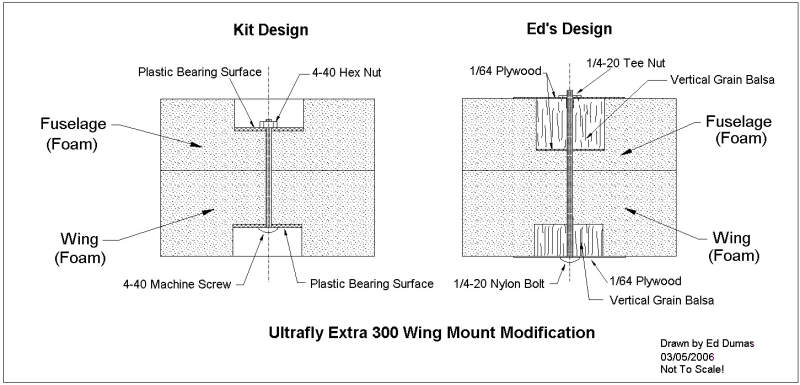
Another modification was made after breaking the wing mount on yet another hard landing. The original wing mount used two plastic bearing surfaces and a 4-40 machine screw as a wing retainer. A 4-40 hex nut was glued into the bearing surface in the fuselage with just a small bit of styrofoam from both the fuselage and wings sandwiched between the plastic pieces to keep the wing in place. The styrofoam sheared during the crash and I repaired it with two pieces of 1/64 ply separated by vertical grain balsa for additional shear strength. I now use a 1/4-20 nylon bolt instead of a machine screw and run it straight through both 1/64 ply pieces. I put a tee-nut on the top 1/64 ply piece to anchor the 1/4-20 nylon bolt. See the CAD drawing to the left for more details. This arrangement has worked well in practice and looks to be a much better way of securing the wing than the kit design.
The next thing to come for the Extra is a brushless motor and speed controller. I bought an Ultrafly A/30/29 kV brushless motor and the Typhoon 25 amp brushless BSC. After installing and trying these, though, I liked the performance of the brushed motor better, so I've reverted back.
Extra 300 Update: I now have a second Ultrafly Extra 300. The first model was damaged in my car (the passenger's seat was pushed back and crunched the tail!) and resulted in stripped servo gears and damaged hinges on the tail surfaces. So I bought a new kit and built it, incorporating the mods listed above, plus a few others and it is flying extremely well. I've rebuilt the original and have it flying, as well. It is nice to have two Extra's now. Maybe next I'll try flying them both at the same time!
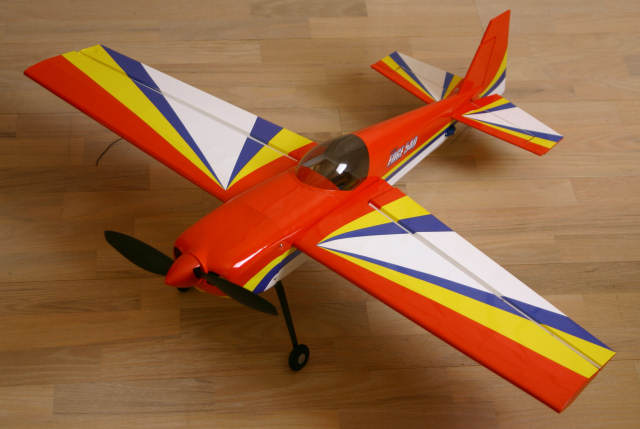
Another RC electric airplane is an E-Flite Mini Edge 540 that I got for Christmas, 2005. I have built it per the plans and test flown it twice. As seems to be the case, these airplanes need a good bit of tweaking before they really start behaving themselves. The Mini Edge is a cute airplane, but the horizontal tail is too small and too thin. The pitch stability is terrible, especially at low speeds, and I believe it is due to stabilizer stall. I'm in the process of building a new stabilizer that is larger and thicker. The kit stabilizer is only 18% of the wing area and 1/16 inch thick, while the Extra is stabilizer is 25% of its wing area and has an NACA0012 airfoil, 12% thick.
I haven't found too many other things wrong with the kit, although the stock landing gear split vertically on one landing. It is carbon fiber, but all the fibers are oriented vertically and it needs some fibers wrapped around the gear to keep it from splitting, much like the full-scale Long-EZ.
The flying qualities right out of the box are not that great. I may not have it setup properly, but the pitch instability at low speeds is not desireable and I don't know how to fix it other than increasing stabilizer area and increasing the stabilizer thickness. I'll try it and see what happens. Stay tuned...
A few months back I bought a Blade CP RC electric helicopter from E-Flite. It is fun, but has been a real challenge to fly. Still working on it and learning how to fly it properly. Stay tuned...
I also have an E-Flite Ultimate Biplane, the new 3-D version with a formed fuselage. The entire model is built from Depron foam and I use the brushless Park 400 outrunner motor with a 1500 mAh, 3-cell Li-Po battery. It flies great and is neutrally stable in all three axes, so it literally "stays where you put it" when doing aerobatics. The 400 motor provides lots of power and gives about 13-15 minute flight times.
As usual, I have made a lot of modifications to the kit and will detail them here soon. Like the GWS Tiger Moth, I've used a good bit of 1/64 ply to reinforce various areas in the airframe, especially around the wing/cabane strut area and bottom wing/fuselage joint. The model is very stable and will slow down and fly at extremely high angles of attack without any bad tendencies. More to come...


I also have a StarMax Electric Ducted Fan (EDF) F-18. This has a 64 mm diameter ducted fan and is molded from styrofoam. This model is very fun to fly and is quite fast. The best part is that it will slow down very well and remains quite stable while flying with no EDF power. That makes approaches and landings quite easy. It is aerobatic, too. It does axial rolls best, with some limited vertical capability. Overall, it is a good flying airplane and I would recommend it highly. These pictures were made with the iPhone 4.
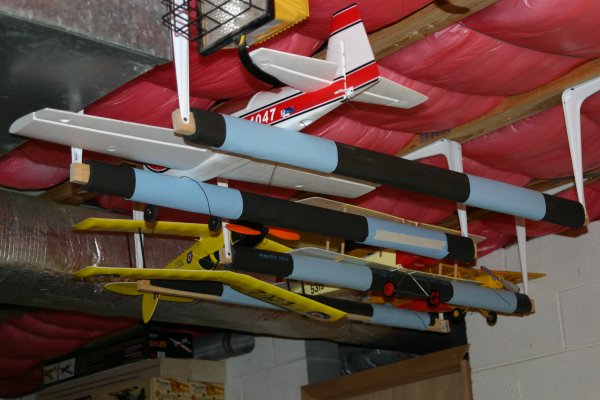
These are the model storage racks I built to keep my models out of harm's way. They are very simple and consist of two 1x2's covered with foam pipe insulation and blue paper towels taped to the foam to keep it from sticking to the model's skin. I used 12 inch shelving angle and sheet rock screws to hold everything together and suspend the 1x2's below the ceiling.
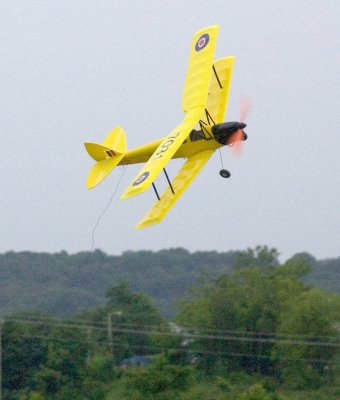
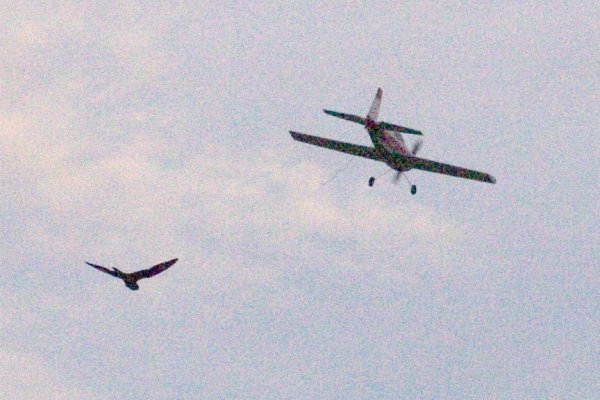
Yes, they actually fly! Here are pictures of the Tiger Moth in flight, as well as the Extra 300S leading a bird on a wild ride!
 Both pictures were made by Dave Senn with a Canon
Digital Rebel with a 70-300 mm image-stabilized lens. ISO setting was 800 which explains the grain in the
images.
Both pictures were made by Dave Senn with a Canon
Digital Rebel with a 70-300 mm image-stabilized lens. ISO setting was 800 which explains the grain in the
images.
Visit Ed's Electric 'Park Flyers' RC Models links page.
Also visit Ed's RC Models page.
ALL CONTENT ©EDWARD DUMAS. USE WITHOUT PERMISSION PROHIBITED!"